


Your Mini Classic countertop water distiller is designed to provide years of dependable service. Like any hardworking appliance, it performs best with regular cleaning and a little routine care.
Fortunately, maintaining your Mini Classic does not require a complicated process. Rinsing the boiling tank, keeping the unit properly ventilated, and periodically checking a few important components can help protect your distiller and support consistent water production.
Follow these simple steps to keep your Mini Classic running at its best.
1. Rinse the Boiling Tank After Each Distillation Cycle
After the distillation cycle is complete, allow the boiling tank to cool before removing it from the unit. Swirl the remaining water and sediment around inside the tank, pour it into the sink, and rinse the tank before beginning another cycle.
This simple step removes concentrated minerals and other material left behind during distillation before they can harden inside the boiling tank.
Always allow the boiling tank to cool before handling it. Never attempt to remove it immediately after a cycle, as steam will likely escape when opening the lid, and the boiling tank may still be very hot.
2. Keep Water Away From the Electrical Connection
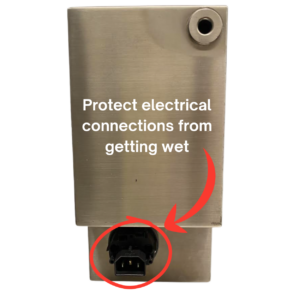
The Mini Classic has a removable boiling tank that makes filling and cleaning convenient. However, it is important to keep water away from the electrical connection on the back of the tank.
Place the empty boiling tank securely in the sink before turning on the faucet. This provides better control and reduces the possibility of spraying water onto the tank’s electrical components.
When filling the boiling tank:
- Avoid spraying or running water over the electrical connection.
- Fill the tank only to the proper water-level indicator.
- Dry the outside and bottom of the tank before returning it to the distiller.
- Confirm that the electrical connection is completely dry.
- Never immerse the boiling tank or its electrical components in water.
Filling the tank to the correct level is also important. Too much or too little water can affect the amount of distilled water produced during a cycle.
3. Visually inspect and/or Deep-Clean the Boiling Tank Monthly
Approximately once a month or every 30 gallons of distilled water, do a visual inspection of the interior of the tank. If you see residue forming on the heating element or the sides of the tank, you should do a thorough cleaning.
How to Clean the Mini Classic Boiling Tank
- Turn off the Mini Classic and allow the boiling tank to cool completely.
- Remove the boiling tank from the distiller and take off the lid.
- Empty any remaining water from the tank.
- Fill the tank to the water-level indicator with hot water.
- Add two tablespoons of Lumen Water Distiller Cleaner. You may also use a mixture of equal parts hot water and white distilled vinegar.
- Allow the cleaning solution to soak for up to eight hours.
- Pour the solution into the sink and rinse the boiling tank thoroughly.
Keep the boiling tank outside the distiller during the entire cleaning process. Do not operate the Mini Classic while a cleaning solution is inside the tank.
Avoid scraping or aggressively scrubbing the heating element. Mineral deposits should be loosened with the cleaning solution rather than removed with abrasive tools.
Note: If you have particularly hard water in your area or use your countertop water distiller frequently, you may need to clean the boiling tank more often.
4. Check the Tank Connections, Gaskets and O-Ring
Before returning the boiling tank to the distiller, take a moment to inspect the areas that create the steam and electrical connections between the tank and the main unit.
Look for:
- Cracks, tears, or uneven areas in the boiling tank lid gasket
- A missing, cracked, or displaced black O-ring in the steam outlet
- Mineral buildup or signs of leakage near the heating element
- Damage or unusual discoloration around the electrical connection
- A loose, worn, or damaged power cord
Make sure the lid is properly centered and securely tightened without over-tightening it. When returning the boiling tank to the unit, push it completely into place so it forms a proper connection.
A worn gasket, missing O-ring, or improperly seated boiling tank may allow steam to escape. Escaping steam can reduce the amount of distilled water collected in the jar.
5. Keep the Fan and Condensing Area Free of Dust
The Mini Classic uses a fan and stainless-steel condensing coil to cool the steam produced during distillation and convert it back into liquid water.
Dust, lint, and pet hair can collect around the fan area and condensing-coil fins over time. This buildup may restrict airflow and interfere with the condensing process.
Periodically inspect the fan area for visible debris. With the distiller turned off, unplugged, and completely cool, use a can of compressed air to gently remove loose dust from the condensing-coil fins.
Do not remove the exterior covers or place your fingers or cleaning tools inside the unit. Contact customer service if the fan is not running, makes unusual noises, or appears damaged.
6. Give Your Countertop Water Distiller Room to Vent
Proper ventilation is an important part of Mini Classic water distiller maintenance. The distiller needs open space around it so the fan can move air across the condensing coil and heat can escape during operation.
Place the Mini Classic on a stable, level surface with at least 3 inches of clearance above and around the unit.
Do not operate the distiller:
- Inside a closed cabinet or cupboard
- Under a counter or sink
- In a small, enclosed area
- Directly against a wall
- With towels, containers or other objects blocking the vents
- Directly beneath an enclosed cabinet where heat and steam cannot escape
If your Mini Classic sits beneath an upper kitchen cabinet, make sure there is adequate clearance and that warm air and moisture can escape freely. Pulling the distiller forward during operation will provide needed airflow and help protect the cabinet above it from heat and moisture.
7. Maintain the Carbon Filter and Replace Worn Parts
The activated carbon post-filter helps improve the taste and aroma of your distilled water.
Rinse the carbon filter regularly in distilled water using clean hands. Gently moving the carbon inside the filter can help prevent it from clumping and restricting the flow of water.
Replace the carbon filter approximately every three months or sooner if you notice an unusual taste or if water no longer flows through the filter properly.
Before installing a new carbon filter, soak it briefly in a separate container of distilled water. This helps prepare the filter and encourages water to flow through the carbon instead of spilling around it.
Normal wear does not mean you need to replace the entire distiller. Many Mini Classic replacement parts can be purchased online, including:
- Activated carbon filters
- Boiling tank gaskets
- Steam outlet O-rings
- Boiling tanks and lids
- Glass collection jars
- Heating elements
- Fan components
- Power cords and other electrical parts
If you are unsure which part your distiller needs, contact our customer service team before ordering. Having your model information and approximate purchase date available can help us identify the correct replacement part.
A Little Water Distiller Maintenance Goes a Long Way
You do not need to spend a lot of time maintaining your Mini Classic. A quick rinse after each cycle, a monthly boiling tank cleaning, and an occasional inspection can make a meaningful difference.
Regular care can help prevent mineral buildup, maintain proper airflow, reduce steam leaks, and keep your Mini Classic countertop water distiller producing dependable distilled water for years to come.
For additional help, visit our water distiller how-to videos, review the Mini Classic manual, or browse our water distiller troubleshooting resources.
Frequently Asked Questions About Mini Classic Maintenance
How often should I clean my Mini Classic water distiller?
Rinse the boiling tank after each distillation cycle and deep-clean it approximately once a month or every 30 gallons. You may need to clean it more frequently if your source water contains a high concentration of minerals.
How do I remove mineral buildup from a water distiller?
Remove the cooled boiling tank from the distiller and soak it with hot water and 2 Tablespoons of Lumen Water Distiller Cleaner. A mixture of equal parts hot water and white distilled vinegar may also be used. Allow the solution to sit 4-6 hours or overnight to loosen the mineral deposits, then empty and thoroughly rinse the tank.
Can I operate my countertop water distiller inside a cabinet?
No. Do not operate the Mini Classic inside a closed cabinet or another confined space. It requires open space around the unit so heat, steam, and fan-driven airflow can escape.
How much space does a Mini Classic water distiller need?
Allow at least three inches of open space above and around the distiller. Make sure nearby walls, cabinets and other objects do not block the unit’s airflow.
How do I clean dust from the Mini Classic fan area?
Turn off and unplug the distiller, allow it to cool completely, and use canned compressed air or vacuum to gently clear visible debris from the condensing-coil fins in the fan area. Do not remove the unit’s exterior covers or reach inside the distiller.
How often should the Mini Classic carbon filter be replaced?
Replace the activated carbon filter approximately every 3 months, or sooner if the distilled water develops an unusual taste or the filter no longer allows water to flow through it properly.
Where can I buy Mini Classic replacement parts?
You can purchase filters, gaskets, O-rings, boiling tanks, collection jars, and other Mini Classic replacement parts online.
Thank you.
Love mine. Good review on maintenance.